
Intercepting Android HTTP Traffic

For newbies of mobile application development and testing, it is a little difficult task to see HTTP requests going out and coming in from/to the device. Specially, when the application is not something under your control, and if still you want to see HTTP requests, you will have to use a proxy to see the traffic. Here, you can find a step by step guide on intercepting HTTP traffic for Android mobile devices and emulated devices with host machine as Linux. However, steps to follow on a Windows system will not be much different.
Tools Needed:
There are multiple tools to sniff packets. Among them, you can use one of the below, which will be discussed here:
- Wireshark OR
- Burp Suite - Community edition is sufficient
The difference is, in Wireshark, you can see traffic in both directions. In Burp Suite, you can see, as well as you can change the request content so that outgoing request is altered from the original at a middle layer of the network path.
Prerequisites:
- Device must be able to connect to the internet through your machine’s WiFi network
This can be achieved by creating a WiFi hotspot in your machine (host machine). Your machine connects to internet using an Ethernet cable (this can again be a WiFi network). That connectivity is shared using a WiFi hostspot. Steps to follow on creating a WiFi hotspot varies drastically depending on the host device’s hardware, OS, etc. and will not be covered here. Then choose your Android device to connect to that WiFi hotspot from WiFi settings.
Once everything is connected, you should be able to see two (or more) network interfaces in your host machine. One is to connect the host machine with internet, and the other to allow other devices to connect with that host machine.
How To: Using Wireshark
You need to install Wireshark in order to see packets. You can use a suitable source from list available at the bottom of this page according to your host operating system. If you are on a Windows machine, you can use Windows installer.
Once Wireshark is installed, you can start it and you should be able to see the network interfaces appearing under ‘Capture’ section in Welcome page.
Since your WiFi hotspot is the interface you are using for your Android device to connect with the internet, choose that interface to capture packets. (In my case, it is ‘wlo1’ interface)

Now you should be able to see the traffic coming out and going in from your device. You may filter to show only HTTP traffic to see a more cleaner output.
How To: Using Burp Suite
First you need to download and install Burp Suite. There is a paid version, but features in free community edition are sufficient for most of our regular work, including this. You can download the community edition here.
There are multiple download options. This article will be based on Linux plain JAR file option. It is simple and no set up needed if you already have Java installed. The JAR should work in Windows environment as well.
Run the downloaded JAR file to start Burp Suite:
1
$ java -jar burpsuite_community_vx.x.xx.jar
You should see the Welcome page of Burp Suite. Choose a ‘Temporary Project’ and then start Burp.
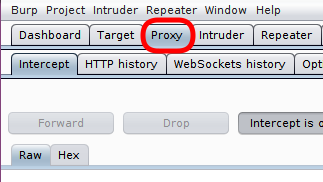
Once the Burp Suite is started, choose ‘Proxy’ tab appearing under menu bar.
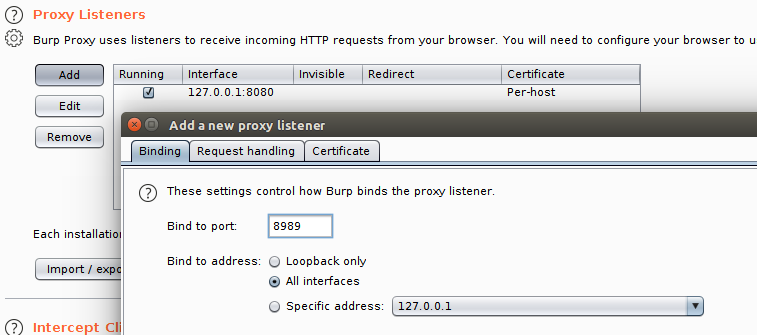
Then you have to setup a proxy. For that, go to ‘Options’ tab in Proxy window. Under Binding, choose a binding port, such as 8989. Then for the address, choose a specific address option. In the drop down list, it should show the network interface address for your WiFi hotspot. We have to choose that from the drop down. You may choose ‘All interfaces’ as well, if you are unclear. But you need this IP address later anyway, so better to find it right now. Click OK to save and close the add new listener dialog.
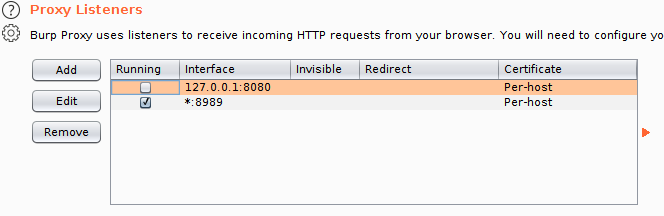
Then the new proxy should appear in the box. Choose to run only the new proxy that we just created in ‘Running’ check box by un-checking the rest.
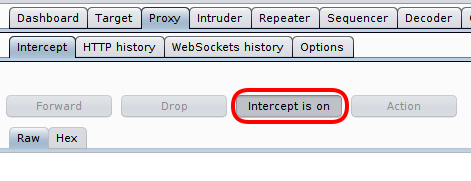
Now you are ready to receive the requests from host side. Check whether interception is turned on in ‘intercept’ tab.
To verify the proxy is running, send a request to your configured port from your browser. You should see a page similar to below:

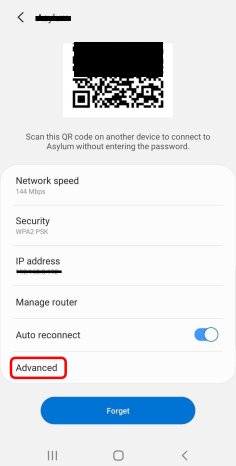
Then you have to configure your Android device to use this proxy. Go to your WiFi connection settings and choose ‘Advanced’.
Choose ‘Proxy’ to Manual and insert IP address of WiFi hotspot network interface, in which Burp Proxy is running, as the ‘Proxy host name’. Set the port as configured earlier (8989 in our case).
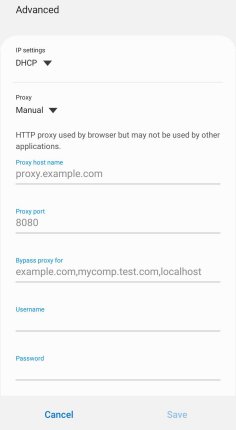
That’s all. You have to save the configurations. Now the requests from your application should go through Burp Proxy. You can verify it by sending a request to a known site using a web browser in your Android device.
When a request is received by Burp Proxy from the device, it will be visible under ‘Intercept’ tab. You can edit the request if needed, and click on ‘Forward’ button to allow sending it to the server. If you want, you can drop the packet as well, so that server will not receive the request at all.