
Intercepting Android HTTPS Traffic

Compared to plain HTTP requests, intercepting HTTPS requests in Android devices is a difficult task. This has become particularly difficult recently, as apps running on Android 7 and above are by default not working with manually added CA certificates (Source).
There are two known workarounds for this.
- Change the application to use a manually added CA certificate
- Root the mobile device and install a new CA certificate as a system certificate
To use option 1, you have to be the developer of the application under test, or you have to disassemble and repack the .apk with required changes.
In this blog, my focus is trying out option 2. As an experiment, I have tried intercepting HTTPS requests using an emulated device running Android 9 (API level 28) by installing a system certificate (Option 2 above, but using an AVD instead of a physical device).
What I did - In Summary:
- Downloaded and installed Android Studio and a suitable image
- Installed Burp CA certificate as a trusted root certificate instead of a user certificate
- Changed emulated device’s network settings to use Burp Proxy
- Sent application requests through Burp Proxy
What I did - In Detail:
As mentioned, with Android 7 and above, applications are not using custom CA certificates unless specifically mentioned before building the apk. We have to install a trusted root CA certificate to overcome this issue. To do that, a rooted device or a system image with root access is needed. Since I do not have a rooted physical device, I tried doing it using an image. First I had to install Android Studio. Bundled with that, I got AVD Manager. Using that, I created a new Virtual Device.
When choosing the image to create the virtual device, following things need to be considered (where I failed initially):
- Some images do not support root access. So we cannot install a trusted root certificate on them
- Image should support disabling
dm-verity - Also, due to some unknown reason, I could not get this done on Android API level 29 image, because
adb remountwas failing. This has already been asked in Stak Overflow, but there were no any answers for that by the time of writing this
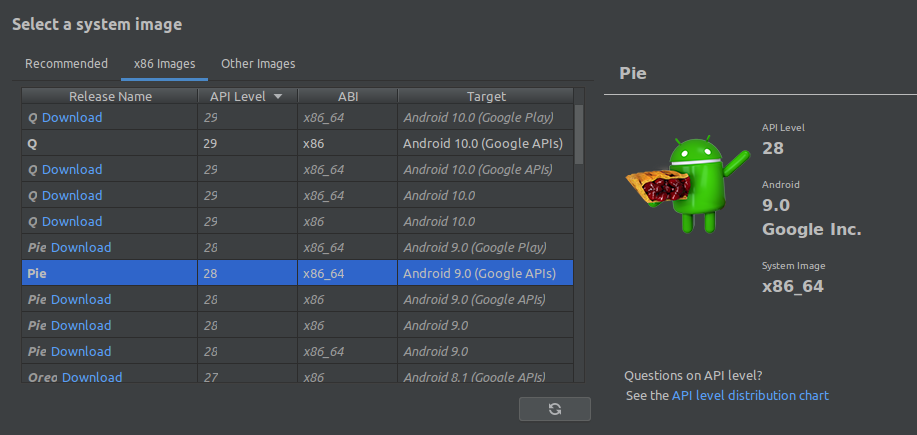
When creating the new virtual device, I selected ‘Pixel XL’ hardware profile. The important thing comes next. That is selecting the system image. It should conform with what is mentioned above.
To support root access, image should be one of the following types:
- Intel x86 Atom System Image
- Intel x86 Atom_64 System Image
- Google APIs Intel x86 Atom System Image
- Google APIs Intel x86 Atom_64 System Image
(i.e., do NOT pick “Google Play … System Image”)
To support disabling dm-verity, ROM should be of build type userdebug instead of user.
To comply with all above, I chose ‘Android Pie API Level 28 x86_64 ABI image with Google APIs)
Once the virtual device is created successfully, it should be shown in your AVD list:
1
2
$ emulator -list-avds
Pixel_XL_API_28_x86_64_1440x2560
Then start the virtual device using command line. You have to give -writable-system option when starting and it will show a warning on that.
1
2
$ emulator -writable-system -avd Pixel_XL_API_28_x86_64_1440x2560
emulator: WARNING: System image is writable
Then we have to verify whether our virtual device supports writing to the /system partition.
To check that, first we will run adb as root.
1
2
$ adb root
restarting adbd as root
Then let’s remount /system filesystem as writable
1
2
$ adb remount
remount succeeded
If successful, you should see the success message. If some error appears, check the image you used to create the virtual device. It is most likely to happen because the image chosen does not support remounting.
Now you can copy files from your host machine to virtual device’s /system partition. To decode HTTPS traffic, you have to copy Burp CA certificate there.
First you need to grab the CA certificate. Run Burp Suite and start the proxy. Let it bind to the network interface that is running the WiFi hotspot in your machine.
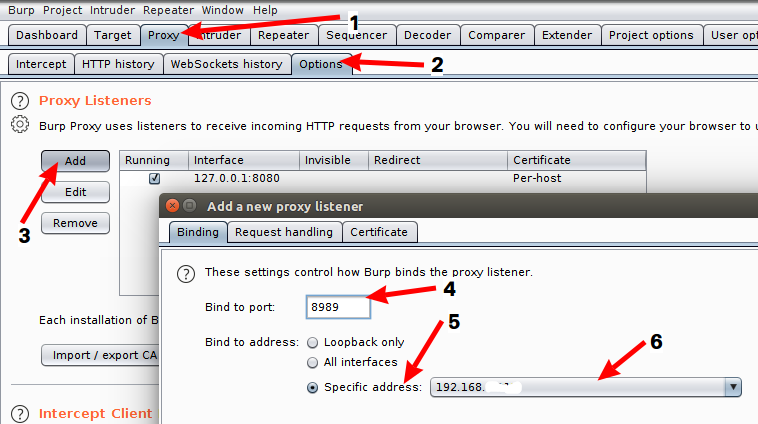
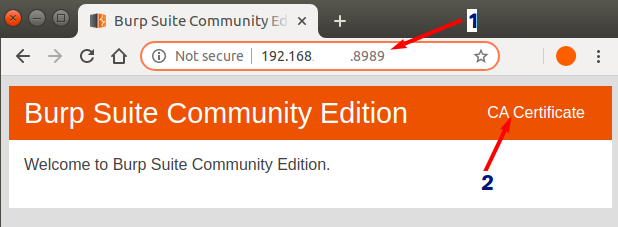
After saving the new proxy, check whether proxy is running by loading the proxy home page in browser. In the meantime, you can download your CA certificate from there.
Now you have to convert and rename the downloaded CA certificate to support Android. Android supports PEM format and it should be named as <some-hash>.0. This <some-hash> can be generated using openssl tool.
To convert, issue the following command, pointing your downloaded CA certificate in earlier step as -in:
1
$ openssl x509 -inform DER -in cacert.der -out cacert.pem
There should be a new file named ‘cacert.pem’
Now you have to find the hash to rename your file. Execute below command and it will output the hash.
1
2
$ openssl x509 -inform PEM -subject_hash_old -in cacert.pem |head -1
9a5ba575
Rename your file with the output hash of the above command.
1
$ mv cacert.pem 9a5ba575.0
By now, you should have a CA certificate in PEM format, that is named as <some-hash>.0, ready to be copied to your virtual device.
Let’s copy the CA certificate to relavant location in virtual device. We can copy it using adb. Certificate should be copied to /system/etc/security/cacerts in virtual device.
1
2
$ adb push 9a5ba575.0 /system/etc/security/cacerts
9a5ba575.0: 1 file pushed. 0.0 MB/s (1375 bytes in 0.176s)
Make sure the new CA certificate file has 644 permission. You can check it by loging into the virtual device using adb
1
2
3
4
$ adb shell
generic_x86_64:/ # cd /system/etc/security/cacerts
generic_x86_64:/system/etc/security/cacerts # ls -l 9a5ba575.0
-rw-r--r-- 1 root root 1375 2019-12-17 16:01 9a5ba575.0
If not, change permissions
1
# chmod 644 9a5ba575.0
In order to take effect the changes and use the new root CA certificate, reboot the virtual device.
1
# reboot
Once the virtual device is boot up, change the network settings of it to use Burp Proxy. Go to ‘Extended Controls’ of the virtual device and under ‘Settings’, open ‘Proxy’ settings. Then give the configurations to send network traffic via Burp Proxy.
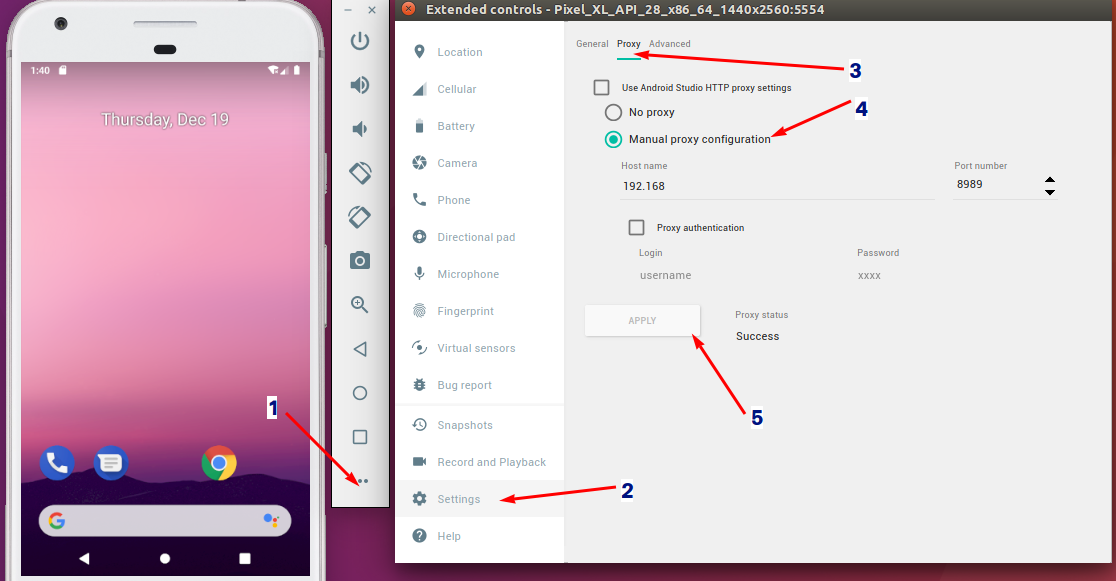
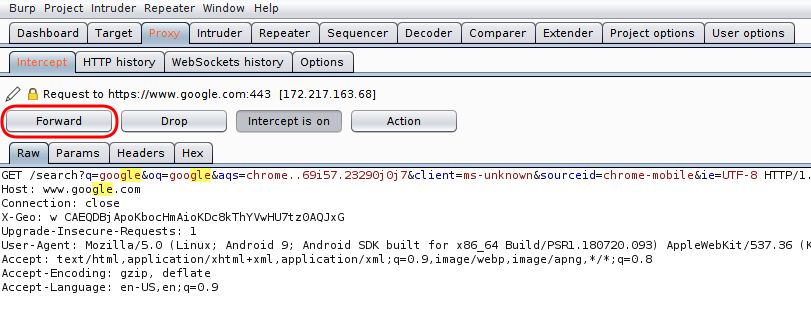
Verify your virtual device is using your proxy. Open Chrome browser and do a simple search there. Requests should be shown in Burp Proxy. Click ‘Forward’ button to allow it to pass through. You may edit the request parameters if necessary, before forwarding.
That’s it. If your are lucky enough, you should be able to intercept and decode HTTPS traffic from your application. Find the apk file of the mobile app, install it and run it.
But still, there are various methods to prevent this sort of man-in-the-middle (MITM) tricks, making things more challenging.